Conditions
Updated: 10/14/2020
Overview
Conditions are the most powerful and complex tool for customizing your scoreboard graphic in Sportzdesigner. Conditions allow a user to define rules for conditionally rendering certain elements on stage. For example, if you are creating a graphic for a football game you will probably include an element to indicate that a penalty flag has been thrown on the play, in this example we will use a yellow rectangle called “rect2”. However, we do always not want to display this penalty flag element, only after a flag has been thrown by the referee. This is the type of situation conditions were created for!
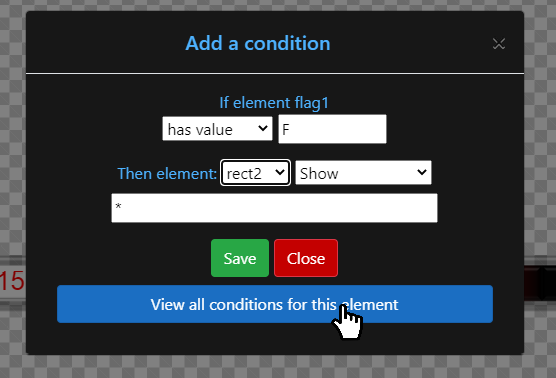
A condition takes the form of an if…then… statement that is defined by the user and attached to a principal element that “owns” the condition. In the previous example of a penalty flag, we would create a condition that said: “If element flag1 has value F then element rect2 show *” and another that said: “If element flag1 not equal to F then element rect2 hide *”. Let’s take a closer look at these conditions.

Click on conditions button

Enter a condition
Anatomy of a condition
A condition is comprised of 6 parts:
- Principal element (condition element)
- Operant condition
- Operant value
- Target element
- Target action
- Target value
Principal Element
- The principal element (or condition element) is the element whose state is evaluated to determine if a condition has been met.
- Is the element in the IF of an element’s if…then… statement.
- Is the “owner” of a given condition. All conditions that an element owns can be found in that element’s condition screen.
- If you delete a principal element, you also delete any conditions it owns.
Show all conditions owned by this element
All conditions owned by this element
Operant Condition
- The condition upon which the principal element is evaluated.
-
The operant condition can have one of these values:
- Has value (equals)
- Not equals to
- Greater than
- Less than
- Changes by
Operant Value
- The value upon which the operant condition is evaluated.
- Is a literal value based on the text value of the principal element.
- Special case: “NULL” is a valid operant value, use this to represent an empty space (“ “) or no data at all in the principal element.
Condition Met
Knowledge of the principal element, operant condition, and operant value of a condition are all that is necessary to determine whether a certain condition has been met. In our previous example of, “If element flag1 has value F then…”
- flag1 is the principal element
- has value is the operant condition
- F is the operant value
- When the element flag1 displays “F”, the condition has been satisfied.
- When the element flag1 displays anything but “F”, the condition has not been met.
- If a condition is not met, the rest of a condition is ignored until the next evaluation.
- If a condition is met, the predicate of the condition (the “then” part) is evaluated.
Target Element
- The element for which conditional action is taken if a condition is met.
- In other words, if a condition is met, then something happens to the target element.
- Choose from a dropdown that contains all your stage elements.
- NOTE: If you delete a condition’s target element the condition will thrown an error in your browser console. As a best practice, you should manually delete conditions whose target element has been deleted.
Target Action
- The action taken upon the target element.
-
Selected from a dropdown, options include:
- Show
- Show Once
- Hide
- Change Color
- Change Font
- Conditional Rule
- Alternate Image
- More options are under development.
Target Value
- The value that defines the target action’s behavior.
- Varies from action to action.
Target Actions Explained
When a condition is met, its target element is modified according its target action and target value. The target value’s content will depend on what sort of action is being taken upon the target element.
Show
Action
- Changes the visibility of the target element to true. If element is hidden, it will be unhidden and displayed.
Possible Values
- Time in milliseconds to show element. For example, a value of 5000 will show an element for 5 seconds before hiding it again.
- Wild card * to show element indefinitely.
Show Once
Action
- Changes the visibility of the target element to true for a single evaluation. This action is useful in a situation where you only want to display the element one time, even though its condition may continue to be true beyond that timeframe.
- For example, if you have a baseball scoreboard where you want to flash the current batter’s headshot as he walks to the plate, but then hide it while he is batting, show once would be the appropriate action. With show once you could: show the headshot for 5000 milliseconds and then it would disappear even though the current batter value has not changed.
Possible Values
- Time in milliseconds to show once.
- Wild card * to show once indefinitely.
Hide
Action
- The opposite of show, changes the visibility of the target element to false. If an element is shown, it will be hidden.
Possible Values
- Time in milliseconds to hide.
- Wild card * to hide indefinitely.
Change Color
Action
- Changes the target element’s fill property.
Possible Values
-
Any acceptable color format
- Color text (red)
- Hex String (#ffffff)
- RGB (255, 0, 0)
- RGBA (255, 0, 0, .8)
- HSV (0, 100, 100)
- HSL (0, 100, 50)
Change Font
Action
- Changes the target element’s font-family property. Only available for text elements.
Possible Values
- Selected from dropdown
Conditional Rules and Alternate Images
- Conditional rules and alternate images will be covered in their own subsequent tutorials.
Example
Going back to our previous example: “If element flag1 has value F then element rect2 show *”, we are now able to breakdown every part of that condition.
- Principal element - flag1
- Operant condition - has value
- Operant value - F
- Target element - rect2
- Target action - show
- Target value - *
And it becomes clear that when flag1 has the value “F”, rect2 will become visible until flag1’s value changes.
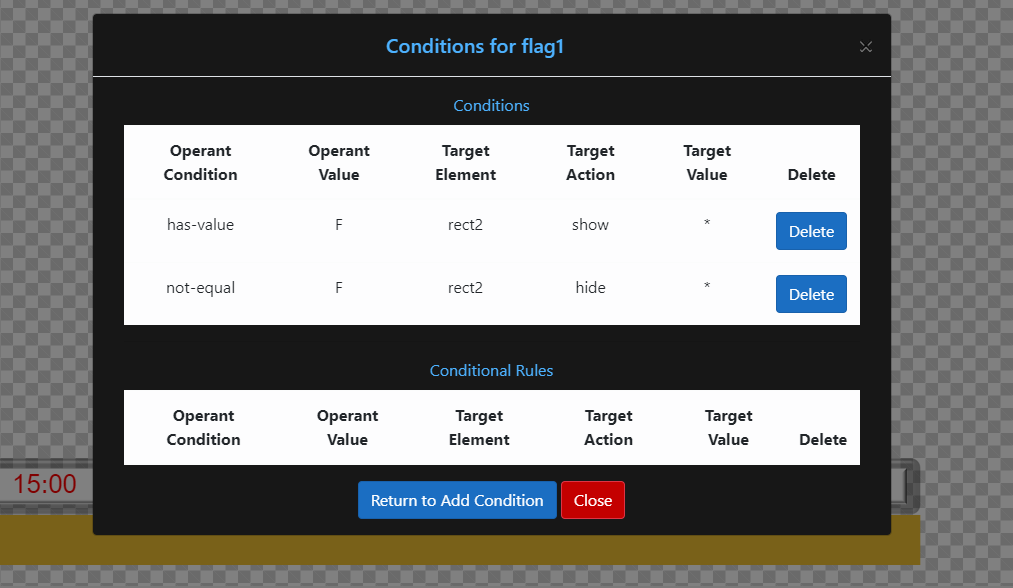
But we are not done yet! To make this condition really useful,
we need create a converse rule on the same principal element that will hide the penalty
flag element (rect2) when a flag has not been thrown in the game.
Specifically, this condition would be: “If element flag1 not equal to
F then element rect2
hide *”.
When these two conditions work together, we see the desired result in our graphic.

Show condition not met

Show condition met (flag1 has value F)
Updating and deleting conditions
Updating and deleting conditions can be done in the “view conditions” screen.
To update a condition, find the condition that you want and click “edit”.
This will return you to the define condition screen. A condition is considered unique if it has the same:
- Principal element
- Operant condition
- Operant value
- Target element
To delete a condition, simply navigate to the “view conditions” screen and click “delete” for the conditions you wish to delete.

Delete conditions
Tips
- Conditions can be leveraged to make a highly customized, animated graphics, however care must be taken when writing conditions. Poorly written, illogical, conflicting, or incomplete conditions will produce unwanted results.
- Conditions can be based on the results of preceding conditions.
- If you delete a condition’s target element, you need to manually delete this condition.